Ethernet Shield Barometric Pressure Web Server
Outputs the values from a barometric pressure sensor as a web page.
This example shows how to use SPI communications to read data from a SCP1000 Barometric Pressure sensor, and how to then post that data to the web by using your Arduino / Ethernet Shield combo as a simple web server. Using the Ethernet library, your device will be able to answer HTTP requests by responding with just enough HTML for a browser to display the temperature and barometric pressure values outputted by your sensor. After completing your circuit and uploading the example code below, simply navigate to your Ethernet shield's IP address, in a browser, to see this information.
See the Barometric Pressure Sensor example for more on how the sensor works.
Hardware Required
Arduino Board
SCP1000 Pressure Sensor Breakout Board
Arduino Ethernet Shield
Circuit
Your Barometric Pressure sensor will be attached to pins 6,7, and the SPI pins of your Arduino / Ethernet shield combo, and powered via your device's 3.3 volt output. Connect the DRDY (Data Ready) pin on your sensor to digital pin 6 on your combo, and the CSB pin (Chip Select) to digital pin 7. Your sensor's COPI (Controller Out Periheral In), MISO (Controller In Periheral Out), and SCK (SPI clock input) pins should then be connected to the SPI pins on your Arduino board/shield. The SPI pin numbers differ depending on which Arduino board you're using and are listed in the SPI reference page. Make sure that the two share a common ground.
After wiring your sensor, your shield should be connected to a network with an Ethernet cable. You will need to change the network settings in the program to correspond to your network.
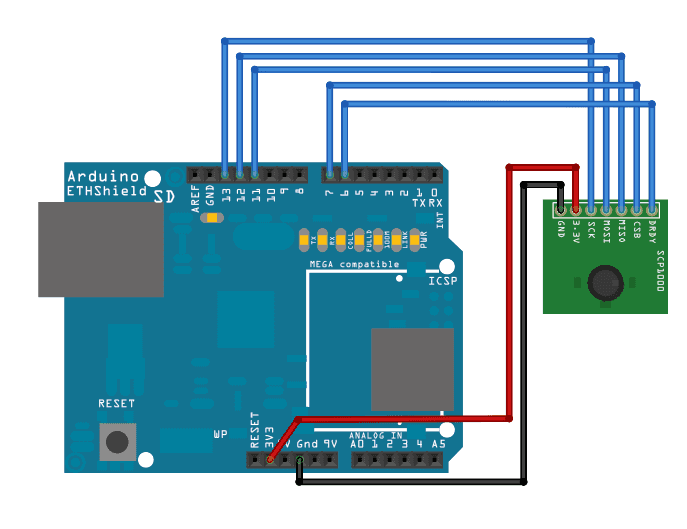
Image developed using Fritzing. For more circuit examples, see the Fritzing project page
In the above image, the Arduino board would be stacked below the Ethernet shield.
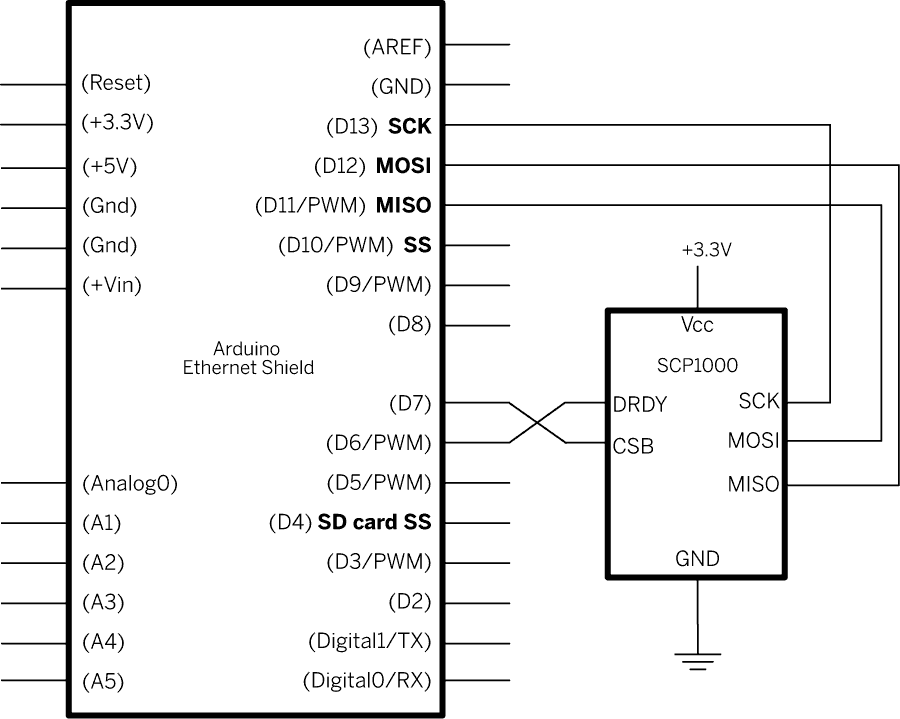
Schematic
Code
1/*2
3 SCP1000 Barometric Pressure Sensor Display4
5 Serves the output of a Barometric Pressure Sensor as a web page.6
7 Uses the SPI library. For details on the sensor, see:8
9 http://www.sparkfun.com/commerce/product_info.php?products_id=816110
11 This sketch adapted from Nathan Seidle's SCP1000 example for PIC:12
13 http://www.sparkfun.com/datasheets/Sensors/SCP1000-Testing.zip14
15 TODO: this hardware is long obsolete. This example program should16
17 be rewritten to use https://www.sparkfun.com/products/972118
19 Circuit:20
21 SCP1000 sensor attached to pins 6,7, and 11 - 13:22
23 DRDY: pin 624
25 CSB: pin 726
27 MOSI: pin 1128
29 MISO: pin 1230
31 SCK: pin 1332
33 created 31 July 201034
35 by Tom Igoe36
37 */38
39#include <Ethernet.h>40// the sensor communicates using SPI, so include the library:41#include <SPI.h>42
43// assign a MAC address for the Ethernet controller.44// fill in your address here:45byte mac[] = {46
47 0xDE, 0xAD, 0xBE, 0xEF, 0xFE, 0xED48};49// assign an IP address for the controller:50
51IPAddress ip(192, 168, 1, 20);52
53// Initialize the Ethernet server library54// with the IP address and port you want to use55// (port 80 is default for HTTP):56
57EthernetServer server(80);58
59//Sensor's memory register addresses:60
61const int PRESSURE = 0x1F; //3 most significant bits of pressure62
63const int PRESSURE_LSB = 0x20; //16 least significant bits of pressure64
65const int TEMPERATURE = 0x21; //16 bit temperature reading66
67// pins used for the connection with the sensor68// the others you need are controlled by the SPI library):69
70const int dataReadyPin = 6;71
72const int chipSelectPin = 7;73
74float temperature = 0.0;75long pressure = 0;76long lastReadingTime = 0;77
78void setup() {79
80 // You can use Ethernet.init(pin) to configure the CS pin81
82 //Ethernet.init(10); // Most Arduino shields83
84 //Ethernet.init(5); // MKR ETH shield85
86 //Ethernet.init(0); // Teensy 2.087
88 //Ethernet.init(20); // Teensy++ 2.089
90 //Ethernet.init(15); // ESP8266 with Adafruit Featherwing Ethernet91
92 //Ethernet.init(33); // ESP32 with Adafruit Featherwing Ethernet93
94 // start the SPI library:95
96 SPI.begin();97
98 // start the Ethernet connection99
100 Ethernet.begin(mac, ip);101
102 // Open serial communications and wait for port to open:103
104 Serial.begin(9600);105
106 while (!Serial) {107
108 ; // wait for serial port to connect. Needed for native USB port only109
110 }111
112 // Check for Ethernet hardware present113
114 if (Ethernet.hardwareStatus() == EthernetNoHardware) {115
116 Serial.println("Ethernet shield was not found. Sorry, can't run without hardware. :(");117
118 while (true) {119
120 delay(1); // do nothing, no point running without Ethernet hardware121
122 }123
124 }125
126 if (Ethernet.linkStatus() == LinkOFF) {127
128 Serial.println("Ethernet cable is not connected.");129
130 }131
132 // start listening for clients133
134 server.begin();135
136 // initialize the data ready and chip select pins:137
138 pinMode(dataReadyPin, INPUT);139
140 pinMode(chipSelectPin, OUTPUT);141
142 //Configure SCP1000 for low noise configuration:143
144 writeRegister(0x02, 0x2D);145
146 writeRegister(0x01, 0x03);147
148 writeRegister(0x03, 0x02);149
150 // give the sensor and Ethernet shield time to set up:151
152 delay(1000);153
154 //Set the sensor to high resolution mode tp start readings:155
156 writeRegister(0x03, 0x0A);157
158}159
160void loop() {161
162 // check for a reading no more than once a second.163
164 if (millis() - lastReadingTime > 1000) {165
166 // if there's a reading ready, read it:167
168 // don't do anything until the data ready pin is high:169
170 if (digitalRead(dataReadyPin) == HIGH) {171
172 getData();173
174 // timestamp the last time you got a reading:175
176 lastReadingTime = millis();177
178 }179
180 }181
182 // listen for incoming Ethernet connections:183
184 listenForEthernetClients();185}186
187void getData() {188
189 Serial.println("Getting reading");190
191 //Read the temperature data192
193 int tempData = readRegister(0x21, 2);194
195 // convert the temperature to celsius and display it:196
197 temperature = (float)tempData / 20.0;198
199 //Read the pressure data highest 3 bits:200
201 byte pressureDataHigh = readRegister(0x1F, 1);202
203 pressureDataHigh &= 0b00000111; //you only needs bits 2 to 0204
205 //Read the pressure data lower 16 bits:206
207 unsigned int pressureDataLow = readRegister(0x20, 2);208
209 //combine the two parts into one 19-bit number:210
211 pressure = ((pressureDataHigh << 16) | pressureDataLow) / 4;212
213 Serial.print("Temperature: ");214
215 Serial.print(temperature);216
217 Serial.println(" degrees C");218
219 Serial.print("Pressure: " + String(pressure));220
221 Serial.println(" Pa");222}223
224void listenForEthernetClients() {225
226 // listen for incoming clients227
228 EthernetClient client = server.available();229
230 if (client) {231
232 Serial.println("Got a client");233
234 // an http request ends with a blank line235
236 bool currentLineIsBlank = true;237
238 while (client.connected()) {239
240 if (client.available()) {241
242 char c = client.read();243
244 // if you've gotten to the end of the line (received a newline245
246 // character) and the line is blank, the http request has ended,247
248 // so you can send a reply249
250 if (c == '\n' && currentLineIsBlank) {251
252 // send a standard http response header253
254 client.println("HTTP/1.1 200 OK");255
256 client.println("Content-Type: text/html");257
258 client.println();259
260 // print the current readings, in HTML format:261
262 client.print("Temperature: ");263
264 client.print(temperature);265
266 client.print(" degrees C");267
268 client.println("<br />");269
270 client.print("Pressure: " + String(pressure));271
272 client.print(" Pa");273
274 client.println("<br />");275
276 break;277
278 }279
280 if (c == '\n') {281
282 // you're starting a new line283
284 currentLineIsBlank = true;285
286 } else if (c != '\r') {287
288 // you've gotten a character on the current line289
290 currentLineIsBlank = false;291
292 }293
294 }295
296 }297
298 // give the web browser time to receive the data299
300 delay(1);301
302 // close the connection:303
304 client.stop();305
306 }307}308
309//Send a write command to SCP1000310void writeRegister(byte registerName, byte registerValue) {311
312 // SCP1000 expects the register name in the upper 6 bits313
314 // of the byte:315
316 registerName <<= 2;317
318 // command (read or write) goes in the lower two bits:319
320 registerName |= 0b00000010; //Write command321
322 // take the chip select low to select the device:323
324 digitalWrite(chipSelectPin, LOW);325
326 SPI.transfer(registerName); //Send register location327
328 SPI.transfer(registerValue); //Send value to record into register329
330 // take the chip select high to de-select:331
332 digitalWrite(chipSelectPin, HIGH);333}334
335//Read register from the SCP1000:336unsigned int readRegister(byte registerName, int numBytes) {337
338 byte inByte = 0; // incoming from the SPI read339
340 unsigned int result = 0; // result to return341
342 // SCP1000 expects the register name in the upper 6 bits343
344 // of the byte:345
346 registerName <<= 2;347
348 // command (read or write) goes in the lower two bits:349
350 registerName &= 0b11111100; //Read command351
352 // take the chip select low to select the device:353
354 digitalWrite(chipSelectPin, LOW);355
356 // send the device the register you want to read:357
358 SPI.transfer(registerName);359
360 // send a value of 0 to read the first byte returned:361
362 inByte = SPI.transfer(0x00);363
364 result = inByte;365
366 // if there's more than one byte returned,367
368 // shift the first byte then get the second byte:369
370 if (numBytes > 1) {371
372 result = inByte << 8;373
374 inByte = SPI.transfer(0x00);375
376 result = result | inByte;377
378 }379
380 // take the chip select high to de-select:381
382 digitalWrite(chipSelectPin, HIGH);383
384 // return the result:385
386 return (result);387}Last revision 2018/09/07 by SM
Suggested changes
The content on docs.arduino.cc is facilitated through a public GitHub repository. You can read more on how to contribute in the contribution policy.
License
The Arduino documentation is licensed under the Creative Commons Attribution-Share Alike 4.0 license.